Tuesday, March 29, 2016

Shopping My Makeup Collection for Spring


Every once in a while I notice I'm in a makeup rut. I just go for whatever I've been using consistently, and forget about all my other products. I don't have tons of makeup, but I do belive that if I have it, I should use it or get rid of it.


First I went through my eye shadows, bronzers, and blushes. Starting at the top of my arm for swatches, we have:
bareMinerals READY Eyeshadow 2.0 in Muse and Passion (the dark purple)
benefit Longwear Powder Shadow in Milk It! - beautiful white highlight
So Susan Universal blush
Clinique Glow Crazy Powder Highligher in 03 Gold Dust (years old, but I had saved it because I didn't want to run out. Now I realize that's pointless)
Clinique Sheer Powder Blusher in 21 Silk Bronze (I got this in middle school for dance recitals. It's ten years old. I need to use it)
The Body Shop baked eye shadow duo in 02 moonstone


I work at a gym, so I almost never wear any colour on my lips. If I'm going out after work and have the rest of my makeup done, I might even wear a nude lipstick, but generally I just wear lip balm or a sheer lip gloss. With spring (possibly) approaching I knew I had to check out my old favourites.
Starting with the furthest left swatch:
Revlon Colorburst Matte Balm in 240 Striking
Clinique Chubby Stick Intense in 08 Grandest Grape
Burt's bees lip gloss in Sunny Day
Rimmel Apocalips Lip Lacquer in Apocaliptic
Rimmel Lasting Finish by Kate Moss in 110


Monday, March 28, 2016

Easter Weekend in Ottawa

Easter Weekend in Ottawa - TheCraftyMann.Blogspot.Ca

For Easter this year we got to go back to Ottawa. Because of the freezing rain Thursday night, our friend drove us in on Friday morning. We arrived too late to go to the Good Friday service, so we went to a GoodLife near my parents' to deadlift. (Yeah, not going back to that club, it's overrun with bros who wear cutoff Popeye's shirts and improper form.)

Easter Weekend in Ottawa - TheCraftyMann.Blogspot.Ca

We had a relaxing day with my parents talking, colouring, crosswording, reading, and "watching" March Madness (I went on Pinterest and probably read more).

Easter Weekend in Ottawa - TheCraftyMann.Blogspot.Ca

Saturday morningwe got to go see Kelsey (and her dogs!) then went to get coffee.

Easter Weekend in Ottawa - TheCraftyMann.Blogspot.Ca

Where would we go for coffee except Suzy Q's for doughnuts! I had the carrot cake doughnut, the one in the middle. It was phenomenal.

Easter Weekend in Ottawa - TheCraftyMann.Blogspot.Ca

It was so great to catch up with Kelsey and show her both our wedding album (she was my maid of honour, and we haven't seen her since I made the album) and the 2015 album.

Easter Weekend in Ottawa - TheCraftyMann.Blogspot.Ca

Saturday afternoon Dad went for a bike ride, so Mom, Nic and I went to the Greenbelt for a nice walk. The sun was so bright, so the snow was slowly melting.

Easter Weekend in Ottawa - TheCraftyMann.Blogspot.Ca

Poor squirrel was being chased down. He had to run for his life.

Easter Weekend in Ottawa - TheCraftyMann.Blogspot.Ca

A bag of seeds had obviously exploded, and this chipmunk was LOVING it.

Easter Weekend in Ottawa - TheCraftyMann.Blogspot.Ca
 
We drove to Nic's parents for dinner, and then went to Hogsback Falls with them for a nice walk. The sunset was beautiful.

Easter Weekend in Ottawa - TheCraftyMann.Blogspot.Ca

Nic wore an adorable bowtie for Easter Sunday.

Easter Weekend in Ottawa - TheCraftyMann.Blogspot.Ca

This is Flopsy. One of the youth brought his adorable bunny to church, and Mom and I were so happy to hold a bunny again.

Easter Weekend in Ottawa - TheCraftyMann.Blogspot.Ca

Gypsy hated being held like that, but that's the only way Flopsy likes it!

Easter Weekend in Ottawa - TheCraftyMann.Blogspot.Ca

Happy Easter from us! We had Easter lunch at Nic's parents', and my parents came over. It's so convenient having our parents live in the same city, and be friends! #InLawGoals

Easter Weekend in Ottawa - TheCraftyMann.Blogspot.Ca

Sunday after my parents left, we went for a walk along the Ottawa river with Nic's parents. It was a BEAUTIFUL day. SO bright.

Easter Weekend in Ottawa - TheCraftyMann.Blogspot.Ca

What a wonderful walk and a wonderful weekend!

Tuesday, March 22, 2016

DIY Lamps


In third year of university, I made this adorable dinosaur lamp. I bought a lighting kit from Home Depot, found some plastic dinosaurs at the thrift store, picked up gold spray paint, a lampshade from the thrift store, and used a scroll saw to create the wooden base. Making a regular lamp is obviously a little easier (but make sure to read the instructions to do the electrical parts!) because there's less drilling and sawing etc.


The awesome thing about making your own lamp is that you can have whatever base you want: I've seen people drill holes into piles of books (aaagh how!?), mason jars, pieces of driftwood... The sky is the limit. Every day that I look at my lamp I feel super proud because I made it.
Side note: Nic's not super fond of it, though he does think it's cool that I made it. I told him that once we have kids it'll be a dinosaur-themed nursery so that I can keep making gold dinosaur DIYs! (My parents even made me gold dinosaur bookends the year after I made this!)

Here are some YouTube tutorials to give you some tips on how to make whatever lamp you want to make! You can also check out my "Lights" board on Pinterest.


 DIY lamp Terrarium - Live Your Style
This one is the most similar to how I put my lamp together. You'll notice that for the height of my lamp I have some plastic tubing (probably leftover from a plumbing project) that was the correct width for the base of the lightbulb to sit on. This means that you don't see any of the wires except the ones coming out of the base.


Copper Tripod Lamp - The Sorry Girls
I hope to make this or something similar to it when we get a bigger place, because it's so art deco! These two girls are so great at their explanations for their DIYs, and super creative.


DIY Concrete Lamp by Rachel Aust
Rachel has an example of when you wouldn't even be using a lampshade. Her style is super cool and minimal, so that's always an option.

Monday, March 21, 2016

A Mini Spring Haul


This Saturday Nic and I headed down to the mall at Keele to pick up some things including bike brakes at Canadian Tire. For the fun things, I picked up a new colouring book, which will be a lot better at de-stressing and more fun than the one I bought in September. Nic bought me this adorable "Some Bunny Loves You" mug from Home Sense, and it's so cute! There's also a cake carryer and Nature's Gate Chamomile Conditioner

 
Wouldn't you just LOVE to have those plants? They would just liven up everything. 


That mug is just so adorable.


My babies are coming up!

Friday, March 18, 2016

Food Friday: Butternut Squash Crockpot Soup & Easy, Homemade Bread

Butternut Squash Crockpot Soup & Easy, Homemade Bread - TheCraftyMann.Blogspot.Ca

Last week there was a very rainy, cold day, so I knew I had to make something warm. Nic had brought home a butternut squash, and I found a super easy crockpot recipe, so that was an easy decision-crockpots make things very convenient. I also hadn't baked any bread since moving to Toronto, so I figured that was the day! The recipe I used makes one loaf pan, perfect for the two of us. 

Butternut Squash Crockpot Soup & Easy, Homemade Bread - TheCraftyMann.Blogspot.Ca

Ingredients for the bread:
3/4 cup warm water (you don't want to kill the yeast if it's too hot)
1 package dry yeast (2 1/4 teaspoons)
1 teaspoon salt
1 1/2 tablespoon sugar
1 tablespoon vegetable shortening
1/2 cup milk
About 3 cups flour

Step 1:
In a bowl of warm water, dissolve the yeast. If it starts to get gloopy, it's working!

Butternut Squash Crockpot Soup & Easy, Homemade Bread - TheCraftyMann.Blogspot.Ca

Step 2:
In a large bowl, combine salt, sugar, shortening, and milk.

Butternut Squash Crockpot Soup & Easy, Homemade Bread - TheCraftyMann.Blogspot.Ca

Step 3:
Slowly combine 2 cups of flour into the bowl of dried goods.

Butternut Squash Crockpot Soup & Easy, Homemade Bread - TheCraftyMann.Blogspot.Ca

Step 4:
On a floured surface (or in your stand mixer) knead the dough until it is soft, not sticky.
Getting the right texture for the dough can be challenging. For years I baked bread and kneaded it by hand, so I now can tell just by looking at it if it'll turn out right.
You want the dough to be sticky to the touch, but easily pull off the sides of your bowl.

Step 5:
Butter a large bowl, and put the dough inside to rise for an hour.
If you have a sunny windowsill, cover the dough and place it there so the warmth will help activate the yeast. Another option is to put it in the oven with the light on.

Step 6:
Punch down the dough, and transfer to your buttered loaf pan. Let it rise for 30 minutes.
Pre-heat the oven at 375*F.
"Score" with 3 cuts across the top, and bake until golden brown, about 45 minutes.
This time that I baked it, it was almost done around 30 minutes, so I tented it with foil to make sure the outside stayed the same, but the inside baked more.

Butternut Squash Crockpot Soup & Easy, Homemade Bread - TheCraftyMann.Blogspot.Ca

Time to start the soup! Check out the original post on Gimme Some Oven.

Soup ingredients:
2 cups vegetable stock
2 cloves garlic, peeled and minced
1 carrot, peeled and diced
1 Granny Smith apple, peeled, cored, and diced
1 medium-sized butternut squash, peeled, de-seeded, and diced
1/2 teaspoon salt
1/2 teaspoon black pepper
1/8 teaspoon cayenne
1/2 teaspoon cinnamon
The original recipe also uses 1 diced white onion (I hadn't realized we had run out!), fresh sage, and coconut milk

Step 1:
Peel, de-seed, and dice the butternut squash. Prep the rest of the fruits and vegetables.


Butternut Squash Crockpot Soup & Easy, Homemade Bread - TheCraftyMann.Blogspot.Ca

Step 2:
Add everything into the crockpot and stir. Cook the soup on low for 6-8 hours, or 3-4 hours on high.

Step 3:
Once the soup is cooked and the ingredients are softened, blend them up. If you're using an immersion blender, make sure the sides of the container are much taller than the height of the soup! We're lucky enough to own a Blendtec, which can blend up the hot soup all in one go.

Butternut Squash Crockpot Soup & Easy, Homemade Bread - TheCraftyMann.Blogspot.Ca

Fresh bread and delicious soup is always a good decision on a cold day! You can add coconut milk, regular milk, or sour cream to the soup when eating it to get a little more creaminess. 

Butternut Squash Crockpot Soup & Easy, Homemade Bread - TheCraftyMann.Blogspot.Ca

I already miss that bread!

Thursday, March 17, 2016

Marble Easter Egg DIY

Marble Easter Egg DIY - TheCraftyMann.Blogspot.ca

Do you love Easter and Easter eggs? I do! Keep reading to find a super cool way to decorate your eggs this year!

Marble Easter Egg DIY - TheCraftyMann.Blogspot.Ca

I spent several days looking at different and cool ways to do Easter eggs. As you can see on my Pinterest board, you can use natural dyes (plants and spices), gold leaf, decoupage, or my favourite but most complicated, Ukrainian Easter eggs. In order to make it a super cheap DIY, I went with this awesome marbled egg design.

What you need:
Real, hardboiled eggs, or fake eggs with smooth surfaces
A container you're okay to throw out
Room-temperature water (the nail polish will sink if the water is cold)
Nail polish of your choice
A stirring stick
A tray to hold the eggs while they dry
Rubber gloves

Marble Easter Egg DIY - TheCraftyMann.Blogspot.Ca

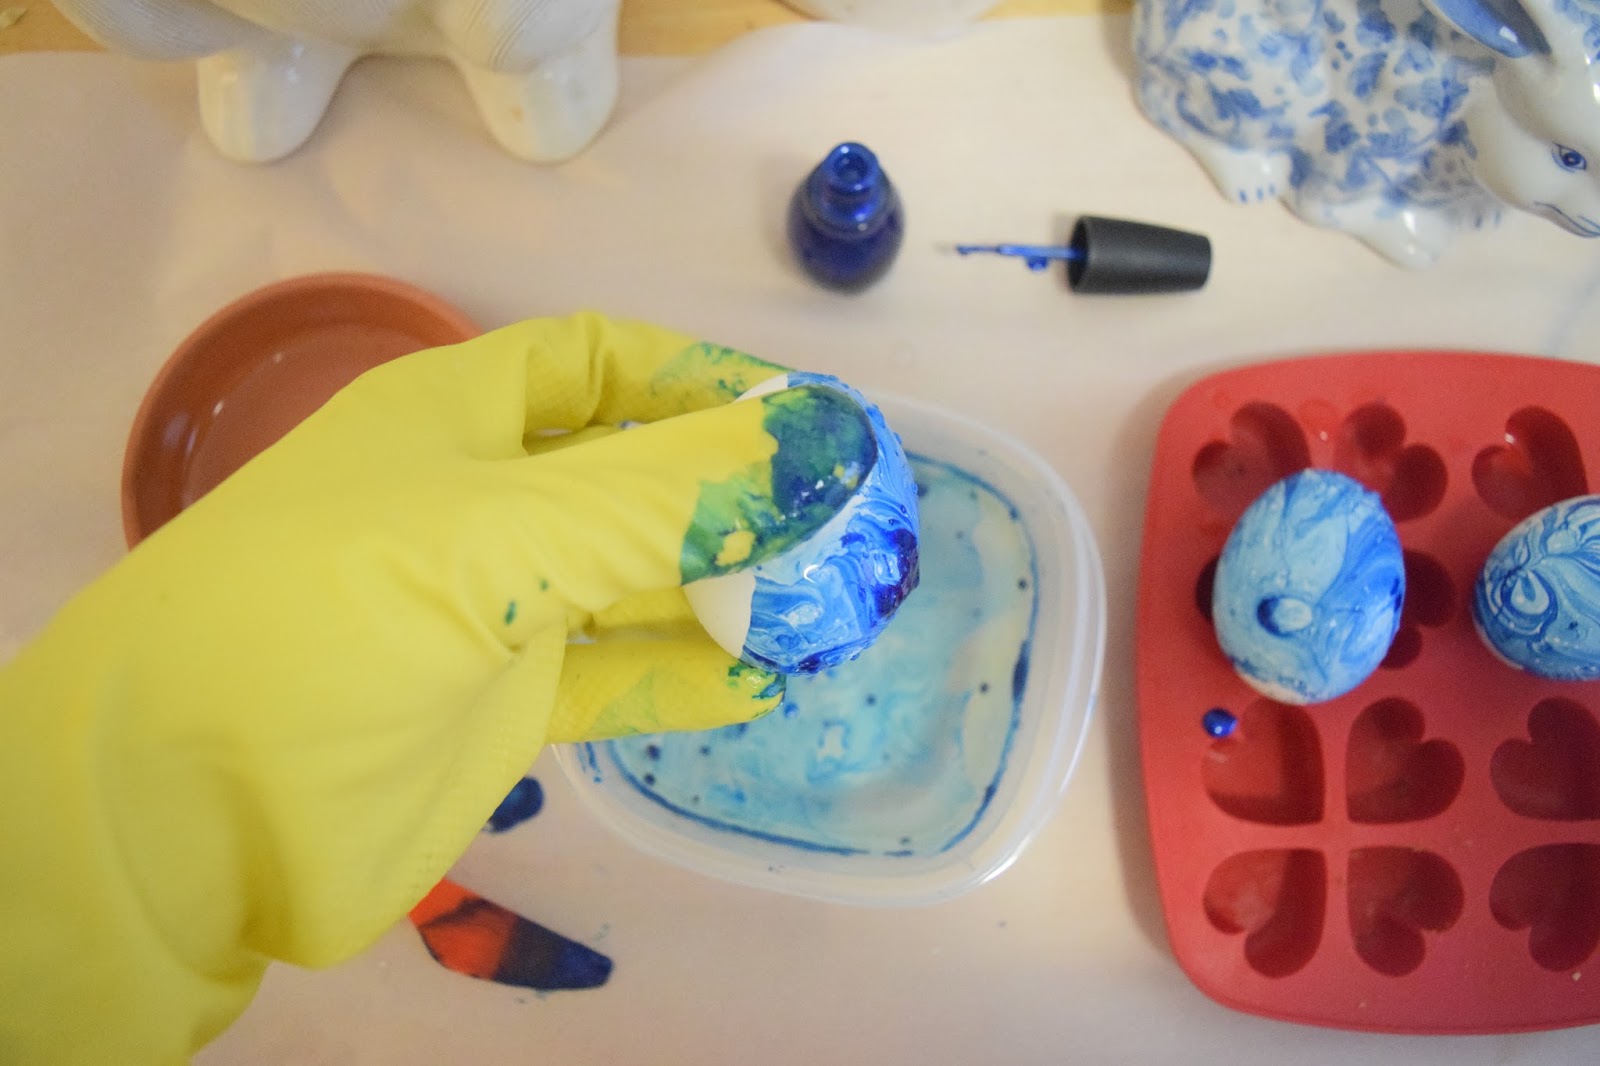
Pour several drops of the nail polish into the water. Let it spread out by itself first on the top of the water, and then stir it so that you get a cooler design.

Marble Easter Egg DIY - TheCraftyMann.Blogspot.Ca

The nailpolish makes a film on the water, so when you dip the eggs in a spot, that's what you're getting. You can do one side at a time, then lay the egg down to dry. They dry relatively quickly, and then you can get to the other side.

Keep in mind: sometimes there is a very, very faint layer of nailpolish in the surface which will make the drops not spread out properly. Clear away the film before you go again.

Marble Easter Egg DIY - TheCraftyMann.Blogspot.Ca

Don't you just love that bunny cookie jar and bunny bank? You can tell I have a thing for bunnies.

Marble Easter Egg DIY - TheCraftyMann.Blogspot.Ca

Marble Easter Egg DIY - TheCraftyMann.Blogspot.Ca

I made this adorable centrepiece to go with it, and I love the white and blue theme.

Wednesday, March 16, 2016

Wedding Wednesday: Choosing Bridesmaid Outfits

Choosing Bridesmaid Outfits - TheCraftyMann.Blogspot.ca
I love how our colour scheme worked out, and that there were similar elements in each dress
Once you have wonderful women who have agreed to stand up next to you and your partner, one of the things you have to consider is what they will be wearing. I knew I wanted to be as nice as possible to my friends, so they were going to get to choose their own dresses that they could possibly wear again. Individual outfits is definitely more modern and comfortable than matching ones, but you do have to work to make sure they are a cohesive look.

Check out our awesome photographers: Taylor Clark Photography 

Step 1: Colour
As you'll see in a picture below, the men wore blue suits to go with our green and blue theme. I went to Home Depot and picked up a bunch of paint chips in greens that I liked. I matched them with the navy and ivory ribbons I had bought, to see which ones would work. I gave Kelsey, Ally, and Jillian strips of the paint chips attached with the ribbons so that they could take them into stores with them. This meant they knew what tone of greens to look at.
Kelsey was the first to find her dress, and from then Ally and Jillian decided who would go lighter and who would go darker.

Choosing Bridesmaid Outfits - TheCraftyMann.Blogspot.ca
Jillian, Kelsey, me, and Ally
Step 2: Style
Together we made a secret Pinterest board (PRO TIP: When planning big things like weddings, make sure all your boards are secret. That way the elements are a surprise to guests) where we posted ideas that we liked. That way we could pick up on the similar themes-relaxed dresses, fitted bodice, and have some similar elements to my wedding dress. If you're buying wedding magazines, pull out pages of the dresses you like and put them in your inspiration binder/board, and check out Pinterest and photographer's pages for looks you like.
My wedding dress has ruching in the chiffon across the bodice, and so does Jillian's. Kelsey and Ally's dresses have similar necklines, and Kelsey's hemline is similar to Jillian's.

Choosing Bridesmaid Outfits - TheCraftyMann.Blogspot.ca

Step 3: Go shopping!
The only person who lived in Ottawa near me, was Kelsey, so I got to see her try the dress on in real life. Jillian was in BC, so at Christmas she showed me the dress. Ally was in the UK, so I saw it on Skype. If you're able to go shopping with them, do it! If not, use all the tools you can to make sure it is a cohesive look: post pictures for each other, send videos, use Skype, etc. Also, be sure to be honest with them: if you really hate their outfit, you'll hate it in the pictures. And they know that. My women were so great in making sure that I loved what they were wearing, which I really appreciated.

Choosing Bridesmaid Outfits - TheCraftyMann.Blogspot.ca
The wedding party
Final Thoughts:
Keep things as simple as possible. Lots of people didn't like that I was planning on having different outfits for the women, which is understandable, but they had their colour swatches, and I'm pretty detail-oriented, so I wasn't worried. It also helped that the men were all wearing the same thing (except Nic had a different tie).
Try to stay away from trends! Yes, our wedding won't look timeless, but at least we didn't do the same looks everyone else was doing that summer.
Your wedding party comprises of people you love. You want them to be happy, and they want you to be happy. So make it a great experience for everyone!

Sunday, March 13, 2016

Easy Spring Wreath DIY From the Dollar Store

Easy Spring Wreath DIY From the Dollar Store - TheCraftyMann.Blogspot.ca

Every season in our apartment I have loved making a wreath for our door. It's a little old-fashioned, but it brings a lot more life to the hallway. I went to Dollarama, my favourite super cheap crafting store and picked up a bunch of things for my wreath. Of course, I have a Pinterest board dedicated to wreath ideas.
Check out my previous wreaths: Christmas and early fall (at the bottom)

Easy Spring Wreath DIY From the Dollar Store - TheCraftyMann.Blogspot.ca

What you need:
Base for the wreath - anything round in the correct size will do. I contemplated using a steering wheel cover from the dollar store, then found this planter which has removable side posts. You can also take a regular wire clothes hanger and bend it into a circle.
Floral wire - or twine to attache all the pieces together. I used twine on my fall wreath because it blended in with the grape vine I was using. I got the super thin, flat stuff that is easy to bend.
Garland - it's obviously super easy to just wind garlands around your circle, so that makes it a lot faster than individually attaching pieces
Any filler - if you want other greenery or flowers to attach to it, get some too.

Easy Spring Wreath DIY From the Dollar Store - TheCraftyMann.Blogspot.ca

Step 1
Separate the greenery from the extra stuff that you want.

Easy Spring Wreath DIY From the Dollar Store - TheCraftyMann.Blogspot.ca

Step 2
Use the wire to attach the greenery to the hoop so the flowers will have something to fix to. If you're using rope instead, tie little loops with double knots around the hoop. With the wire method, you can wind it around to hold it especially tight.

Easy Spring Wreath DIY From the Dollar Store - TheCraftyMann.Blogspot.ca

Step 3
Finish attaching all the greenery and make sure you like it's placement before you add the garlands.

Easy Spring Wreath DIY From the Dollar Store - TheCraftyMann.Blogspot.ca

Step 4
Wind the garlands around the wreath. I went pretty slowly and wound fairly tightly so that the flowers would stay front-facing when you're done. For my wreath I used two garlands which were both over a meter long.

Easy Spring Wreath DIY From the Dollar Store - TheCraftyMann.Blogspot.ca

Easy Spring Wreath DIY From the Dollar Store - TheCraftyMann.Blogspot.ca

Step 5
When the wreath is hanging up, adjust it so that the greenery and flowers are showing the way you want them to.


What do you think? Do you love wreaths like I do? Have you made one for Easter yet?